4 Steps to Year-End Processing in Sage 300 (formerly Accpac)
 There are many year-end procedures available in Sage 300 ERP (Accpac). Most of them are optional. Best of all, once you have finished your year-end procedures, you can continue to enter transactions to the previous year or enter to the New Year. You can run reports from both years with ease. Sage 300 ERP (Accpac) easily keeps it straight for you. Even payroll processing requires no special year-end preparation. You can print your W-2 and 1099 reports for the prior year at your leisure.
Step 1 – Create the New Year in the Fiscal Calendar
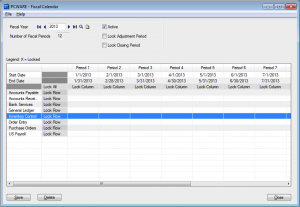
This must be done before you can enter transactions in any sub-ledger with dates in the new fiscal year. Double-click on “Common Services” folder/icon then double-click “Fiscal Calendar”. Click the “New” button, then the “Add” button. Save the changes.
Verify that you have added fiscal year 2013.
Step 2 – Create the New Year in General Ledger
This must be done before you can post general ledger transactions to the New Year. This is easy to do, but you need to take some precautions.
Make sure you have a good backup of your data.
If you are not sure about the backup status, make a backup copy of your database; Make sure all users have closed out of Accpac before backing up the database. Call for help if needed. Do not skip this step.
Verify the historical data settings in General Ledger Setup.
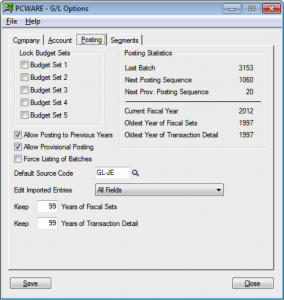
Double-click on “General Ledger” folder/icon and then double-click on “Setup”, then “Options”. This should bring up the GL Options window.
Please note that the “Current Fiscal Year” displayed in the middle-right of the window should reflect the year just ending. Once you have created the New Year, you can revisit this screen to verify that the current year is now the New Year.
Most importantly, look carefully at the two fields labeled “Keep” in the lower left and adjust the numbers as necessary. When you create the new fiscal year, data older than this will be erased from your General Ledger database. (This has no effect on transaction history in any sub-ledger).
We recommend keeping the maximum number of years of “Fiscal Sets”, since this data is used for financial reporting and is also relatively compact. If you have a lot of general ledger transactions, you may want to limit the number of years of “Transaction Detail” you keep to something less. The number of years of fiscal 7721 and transaction data you can retain varies based from 99 to 7 years on the program “Edition” you are running.
Please check your documentation or call us for more information on this.
Once you are satisfied with the historical data settings, save and close the window.
At this point, it is important to make sure all other Sage 300 ERP (Accpac) users have closed out.
Check this on the “Help/Lanpak Users” menu of the Sage 300 ERP (Accpac) desktop.
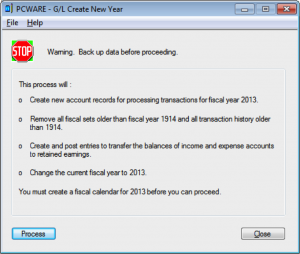
Go back to the top level of “General Ledger” folder/icon then double-click “Periodic Processing”, then “Create New Year”. Please heed the “Back up data” warning. Quit Sage 300 ERP (Accpac) and make a backup if necessary. This is much easier than trying to untangle the mess later if something goes wrong.
If you are satisfied with the backup status of your data, go ahead, click the process button and watch the system create closing entries. Depending on the size of your database, this could take some time. When this is finished, a completion message will pop up.
Print the message if you like, then close the windows and go about your business. You can print the closing entry posting journal and perform other optional year-end tasks now or later. Depending on the status of sub-ledger transactions and your preferences, you can now enter and post transactions in General Ledger or the sub-ledgers in both the previous and New Year.
Recommended ongoing process
Step 3 – Lock the prior year accounting periods in the Fiscal Calendar
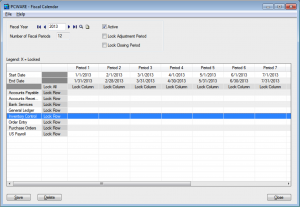
It is a good idea to lock the fiscal periods for the prior year to prevent accidental posting. Locked periods can be unlocked at any time to enter and post backdated entries when necessary, including year-end adjustments generated by your accounting department or your outside CPA. Some of our clients prefer to lock fiscal periods on a monthly or quarterly basis as the year progresses.
This is a simple procedure: Double-click on “Common Services”, folder/icon then double-click “Fiscal Calendar”. Type in or scroll to the previous year (say 2011) and press the “Tab” key. The accounting periods for the previous year will appear on the top of the window. To lock or unlock a period, double-click on the “Lock Column” field to the bottom of the period -end date. You can also highlight the status field and press the “Space” bar to change the value. Save your changes and close the window.
Step 4 – Clear Activity Statistics in A/R and A/P
(Because this process is the same in both A/R and A/P, we will review only A/P. We do recommend that you follow the procedure for both modules.)
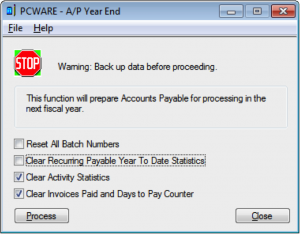
This Process updates the Vendor Activity Statistics in the Vendors screen form and related reports. It moves vendor activity statistics for the current year into the previous year, and zeros the totals for the New Year.
You should also run the associated process to clear the Invoices Paid and Days to Pay Counter. These records are for information only. This is not an accounting procedure, and the timing need not be exact.
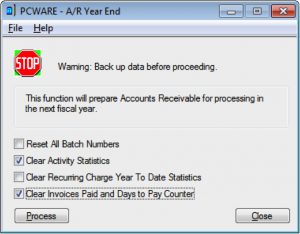
Go to Accounts Payable/Periodic Processing, and then double-click on “Year End”. Please note: we recommend checking only the bottom two check boxes in this window in A/P, 2nd & fourth box in A/R.
The videos below takes you through the steps:
How to do an Accounts Receivable Year-End
In this video, we talk you through the steps in how to complete an Accounts Receivable Year End in Sage 300 ERP.
Part 1
In Part One, we outline the General Ledger Financial Year End Procedures in Sage 300 ERP starting with Step 1 and 2: Create New Calendar and Locking and Unlocking Periods.
Part 2
In Part Two, we continue to outline the General Ledger Financial Year End Procedures in Sage 300 ERP with Steps 3 and 4: Post all Current Transaction in GL and Back-up Your Data.
Part 3
In Part three of our series of videos that outline the General Ledger Financial Year End procedures in Sage 300 ERP, we continue on with Steps 5 and 6: Print Trial Balance and Financial Reports and Create New Year and View Transaction History.
Part 4
In our final part of our four part series of General Ledger Financial Year End procedures for Sage 300 ERP, we outline Step 7 that involves printing and clearing reports, posting journals, resetting batch numbers, printing reports and posting to previous years.

